 WordPress is no doubt a great CMS system and most sought-after blogging platform. What makes it so popular among masses is the ease it provides in website creation and maintenance. Most importantly, WordPress enables to extend the functionality of a site via plugins. So, if you want to embed some additional functionality to your site, you can choose a plugin from the WordPress plugin repository and install one that fulfill your purpose. But, what if plugins don’t function as per your exact needs? Well, then you can create your own plugin.
Writing your own plugin isn’t an easy feast and instead may be turn out to be a daunting prospect. This post will help you understand the process of building a WordPress plugin, which requires creating a file structure and using hooks, essentially, triggers that allows users to modify certain areas of a WP plugin or allow adding custom code. Before diving in-depth about the process of writing your first WordPress plugin, let’s first understand about a few things that you’ll need to consider during plugin creation.
Things to Consider When Creating a Plugin
When getting started with the plugin creation process, you’ll need to define it – so that WordPress recognizes it. And in order to define the plugin, you should consider the following things:
1. Name of the Plugin
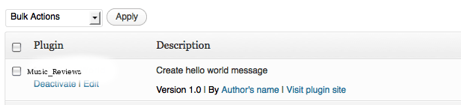
When you’ve been thinking about creating a plugin, it’s very important to understand its purpose and assign it a name accordingly. Put it simply, you need to analyze what the plugin will do and assign it a unique name. In order to ensure that your plugin name is unique check out other plugins provided in the WP plugin repository or conduct a Google search. You can choose a name that somewhat defines the functioning of your plugin. For instance, a music related plugin can have music in its prefix, and it may be called as “music-reviews”.
2. Plugin Files
Once you’ve proposed a name for the plugin, next you’ll have to create a PHP file with the same name as that of your Plugin name. For instance, as discussed above if you have named your plugin as “music-reviews”, then the file will be named as “music-reviews.php”. This file needs to be placed into the WordPress Plugins directory. However, make sure that no two plugin files should have the same name.
3. Readme Files
While hosting your plugin, you need to create a readme.txt file that is included in plugin you’ve created. These files are quite helpful for both users as well as developers, as they provide plugin description.
4. Homepage (web page for your plugin)
Once you’ve created your own plugin, you’ll most likely want to share it with other users or the WordPress community. For this purpose, you will be required to create a home page that will let people know about the purpose of the plugin, how to install it, the version it is compatible with and so on.
5. Plugin Header
Every plugin needs to have a header prior to standard plugin information (in the comments block). Header let WordPress know that your plugin exists and provide its information on the plugins’ management screen to activate the plugin. Remember, without a header plugin can’t be activated.

Below is an example of how a plugin is defined:
<?php

/**

* Plugin Name: Music Reviews

* Description: This is my first Plugin.

* Version: The Plugin's Version Number, say 1.0

* Author: ABC

* Plugin URI: http://URI_Of_Plugin

* Author URI: http://URI_Of_Plugin_Author

*/

?>
Initializing Your Plugin
So, now that WordPress recognizes your plugin, you’ll have to make it functional and trigger some sort of event. For doing so, you will need to use WordPress hooks.
What are WordPress hooks and what they mean?
WordPress hooks allow users to make their plugin “hook into” WordPress, in particular, it allows plugins to call a function in order to make a plugin to something. Hooks are of two kinds – “Action” and “Filter” hooks. The action hooks allows to insert custom code at several points and the filter hooks allows manipulation of bits of content (like the content of a post or web page).
How to Apply Action Hooks?
Generally, a plugin is in two states post installation, it is either in active or inactive state. In order to perform a plugin activation and deactivation action, you can register “activation hooks” and “deactivation hooks” respectively.
register_activation_hook(__FILE__, 'music-reviews_activation');

register_deactivation_hook(__FILE__, 'music-reviews_deactivation');

function music-reviews_activation() {

//actions to perform post plugin activation

}

function music-reviews_deactivation()

{

// actions to perform after plugin deactivation

}
How You Can Work With Filter Hooks?
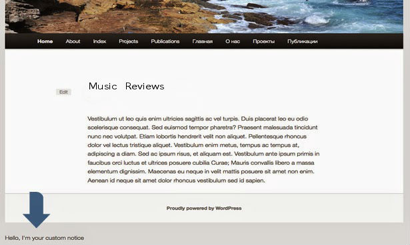
Filters operate with the same logic of action hooks. The only difference is that you don’t need to perform coding. Rather code is executed merely to MODIFY the parts of content. Let’s take an example, of a filter hook that allows to add a bit of content at the end of a post.
$content = apply_filters('the_content', $content);
Now using the above filter hook you can add something at the end of your blog post, as shown in the code below:
function music-reviews_post_footer($content) {

       $content .= "<div class='music-reviews-post-footer'><p>This is custom post footer</p></div>";

       return $content;

}

add_filter('the_content', 'music-reviews_post_footer', 100);
If you want to know what type of action and filter hooks are available in WordPress, you can refer to WordPress Codex.
Introduction to Settings API
Once you’ve installed your plugin and activated it, possibly you may want to manage it’s settings. In order to manage your plugin settings you’ll need to create an interface in the Settings API. For automatically processing the input and the output sections on web pages and the fields provided within those sections, you will need to mark a page as the settings page. Next, register the settings.
<?php register_setting($option_group, $option_name, $sanitise_callback); ?>

<?php add_settings_section( $id, $title, $callback, $page ); ?>

<?php add_settings_field( $id, $title, $callback, $page, $section, $args ); ?>
In order to get a more detailed explanation of the above parameters, it is recommended that you should refer to WordPress Codex. After completing the registration of options and sections with a set of fields, you need to showcase them on the settings page along with below mentioned function inside the <form> tag.
<?php settings_fields($option_group); ?>

<?php do_settings_sections($page); ?>
Conclusion
After reading and understanding all the above factors, you can begin writing your own WordPress plugin. Once you’ve built a plugin, then by uploading your plugin directory to your WP site installation will make the newly created plugin visible and you can activate it, as and when required. This post is written with the objective to make you aware of the basic requirements you should consider and work upon to build your custom WordPress plugin.
About The Author:
Ben Wilson is a WordPress savvy guy having interest is providing WordPress Plugin Development services. Besides all this noteworthy and fruitful services deliverable, he has helped many companies in successfully completing their projects. Presently he’s working with WordPrax Ltd. – a WordPress development company. He also likes sharing thoughtful ideas and insights about WordPress and related services.